
Maximum of the time, when you try to establish a connection between an external hard drive and your Mac’s USB port, you promptly recognize it to install on your desktop. Apple makes sure to assure these are simple to spot, so they also arise within the Finder near the left-hand column below Devices, because Mac’s handle them the very way like another computer.
But, sometimes, you may come across a situation when the external hard drive is not working on a MacBook. It’s irritating, particularly when you require transferring some data right then. Let’s go through and take a glance at why this continues occurring and how you can solve the issue and recover data to locate your documents.
1. Make Sure to Connect Your Drive and Check /Volumes/
All mounted and connected volumes are likely to show up under your /Volumes/ folder. On launching Finder, in the menu bar, make sure to tap on Go > Go to Folder. After that, type /Volumes/ and click on the Enter button. You’ll be navigated to a folder that reveals you each of the mounted drives including disk images.

If you get your drive to be present here, try locating it. If you are used to locating your drive that arrives on your desktop, make sure to launch the Finder, and under the menu bar go to Finder > Preferences > General. Go through the boxes to find out which drives display up at your desktop.
2. Check Disk Utility
Launch Applications > Utilities > Disk Utility (or simply search Spotlight for it). This system utility records all associated drives, including mounted or unmounted obstructions. If your drive points up though the partition is not mounted, make sure to right-click the partition and choose Mount.
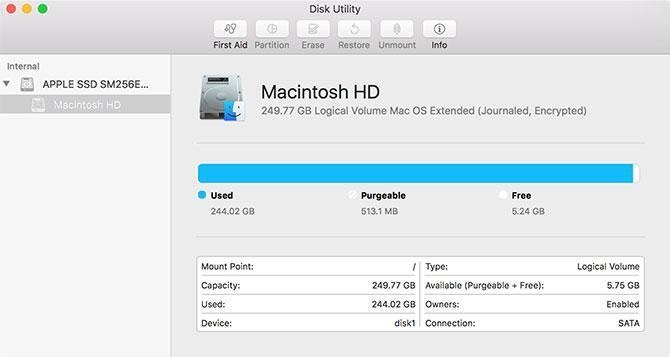
After everything, if the external hard drive is not working on a MacBook, you might need to try choosing the drive or modified partition then tap on First Aid. Disk Utility is likely to control the volume for intricacies, and if it identifies any, you will be provided with the choice to Repair Disk. If your drive is not writeable or approved by macOS, this option of First Aid cannot do anything.
3. Rebuild the Launch Services Database
Some users reportedly stated that their success in getting their earlier lost drives easily display up by reconstructing the macOS launch services database. The brand, Apple, defines this as being “an API that allows a running app to open different apps or their document data in a fashion comparable to the Finder or the Dock.”
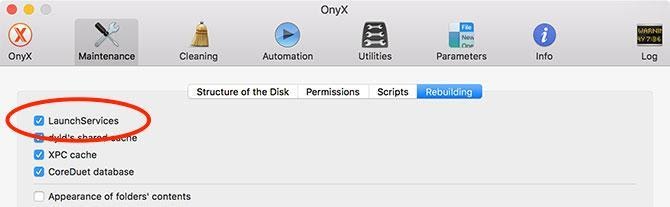
Furthermore, you can restore the database with the help of easily downloading and introducing free maintenance application OnyX. Make sure to launch it and enter your administrator password to allow OnyX to make changes. The application may request to check the composition of your desk; so make sure to tap on the Continue option and wait. OnyX will quickly show unresponsiveness while the method ends.
4. Cycle USB Ports and Cables
USB Ports and wires are electrical connections, plus they’re likely to wear and tear that can point to total collapse. If your external HDD is not showing up, make sure to try utilizing a different USB port altogether to notice if that creates a difference. In the case of the Drive display, it symbolizes there is a difficulty with that appropriate USB port (you might be capable of fixing this if you are tech-savvy enough).
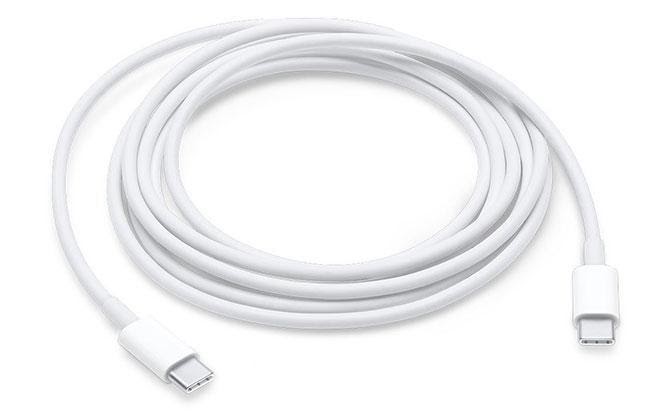
Furthermore, if that does not work, pay your utmost attention to the USB cable. If you have not used the hard drive for a long time, make sure to examine whether you’ve got the most suitable kind of cable for the same or not. Some older drives need USB leads including separate control connectors. Also, older drives need dedicated DC control adapters, therefore make sure you are not avoiding one of them.
You can also attempt to switch out the cable concerning a different one and check if that makes a difference at all. If you are troubleshooting a USB flash drive, inspect the connector concerning signs of damage.
Table of Contents


